Setting Up Your Timing System For a Meet

Welcome to our guide on how to set up Colorado Time Systems for a swim meet! Colorado’s timing systems are a popular choice for swim meets because they are accurate, reliable, and easy to use. In this post, we will walk you through setting up your timing system for your swim meet from start to finish. Whether you are a seasoned swim meet director or a newcomer to the world of competitive swimming, this guide will provide you with the information you need to ensure that your swim meet runs smoothly and efficiently. Let's get started!
Setting up your console
The console is the hub of your timing system. It connects all the other components, like your computer, the touchpads and buttons, and the scoreboard. To start, take it out of the protective box. It’s a good idea to position it near an outlet, the scoreboard port, and the side where you will put touchpads. If you have a Colorado-branded wallplate, locate it there instead. To start, plug it into power. The cable is relatively short, so you may need an extension cord or power strip. Flip the switch on the back and wait for it to complete a short testing sequence. Then, press the button next to the on-screen label “Swimming / Diving”.
Connections
First, connect the scoreboard. If you don’t have a scoreboard, you can skip these steps. Plug the scoreboard cable into the wall. To locate the port to connect it, look for a plate on the wall with a small, circular hole. There may also be a cable hanging from your scoreboard or in a box on the wall. Plug this cable into your timing console. The location may differ between System 6 and 5 consoles, but there should be a quarter-inch circular hole.
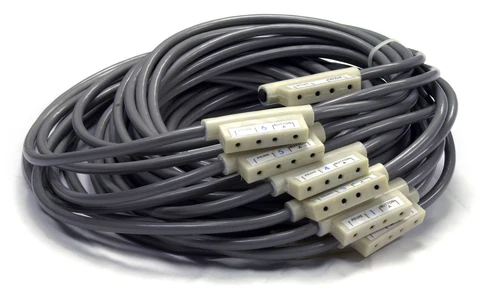
If you have a deck cable (shown above), follow these instructions. Next, connect your deck cable. Either directly connect it to the console, or connect it to the wall plate. The deck cable is a long, gray cable with white blocks for lanes. It has a black connector on one end. Plug that black connector into the timing console, at the port marked “Near End” or “Primary Input.” Make sure to match the large side of the connector with the large side on the console. String the cable across the lanes on the starting side. You may need to wrap it around each block if it is longer than your pool. Make sure to leave one white connector before the first lane, as it is used for starting.
If you are using software like Hytek Meet Manager, plug a serial to USB cable into the port marked COM 1. Connect this to your meet computer. To get it set up in Meet Manager, follow our guide on connecting your console to Meet Manager.
Touchpads and Buttons
The next step to get your meet up and running is putting in your touchpads. To start, put your velcro strips on the gutter, with the plastic flange on the gutter side. If they don’t fit this way, then flip them around. Install them so that they span between lanes, so each lane has 2 velcro strips, each half in it and half in the lane to the left or right. Next, grab a partner. Touchpads are expensive and unwieldy, so it’s always helpful to team-lift them.
Put one touchpad in each lane, resting on 2 velcro strips. Connect the touchpad to the port on the deck cable marked "Prime". Make sure that the number marked on the cable matches the lane number. Complete this for every lane.
If you have plungers for timers, connect one to each lane in the port marked "Button A".